Getting the default MSX font pattern
In the last article, we learned how to modify a single character from the original MSX font type, and we also found out the differences between Screen 0 and Screen 1 character, but now what we want to do is to create our own personal font type as artsy as possible. Fancy!
Before we start designing our character pattern, I thought “wouldn’t be nice to have the original pattern so we could see what we are actually doing?”. Sure I’m no professional font designer, and the best I can do is to stretch some vowels and add some curves at the consonants, and for that, I definitely need to have the original character showing on the screen for reference.
Where do the character fonts come from?
Now there is something I’ve always taken for granted and never imagined that would be something noticeable, but every computer comes with a pre-defined font pattern stored somewhere, otherwise, it wouldn’t print anything readable on the screen.
On an MSX machine, as stated on the MSX.org wiki page, the font pattern is copied from the main ROM to the VRAM every time we invoke the Screen routine to set the screen mode, replacing any pattern currently stored at the VRAM. While on Screen 0 (40×24 text mode) the pattern occupies 2 KB of VRAM from 0800H to 0FFFH, and on Screen 1 (32×24 text mode) the pattern also uses 2 KB of VRAM from 0000H to 07FFH, and this information is important because we are about to copy the pattern from the address defined by the video mode to the RAM, so we can print the patterns in the screen and do some cool stuff with that.
It took me quite some time to figure out what I should do to move the pattern data between MSXPen and TinySprite since these are the two tools I rather use in my Chromebook when I do my research. There are several other tools out there that run on Windows, Linux, macOS, and even in real MSX machines, but I want to avoid anything that cannot be promptly used from the browser, and I even may create some online tools in the future to make things easier but that’s something for another day.
At first, I created this code that copies the data from the address 0x8*49 (Pattern for the character 0) to the RAM, then uses the bit command to compare each bit from the bytes of the pattern and print “0” or “1” based on the result from the command, and it’s important to notice that we aren’t storing the results in any other place than the actual screen. Using the MSXWeb emulator from the MSXPen site we can press the “alt+c” key combination to copy the screen content to the clipboard (yep, I’m that old, and yep, it’s the actual name of this function) so then we can paste it in a text file.
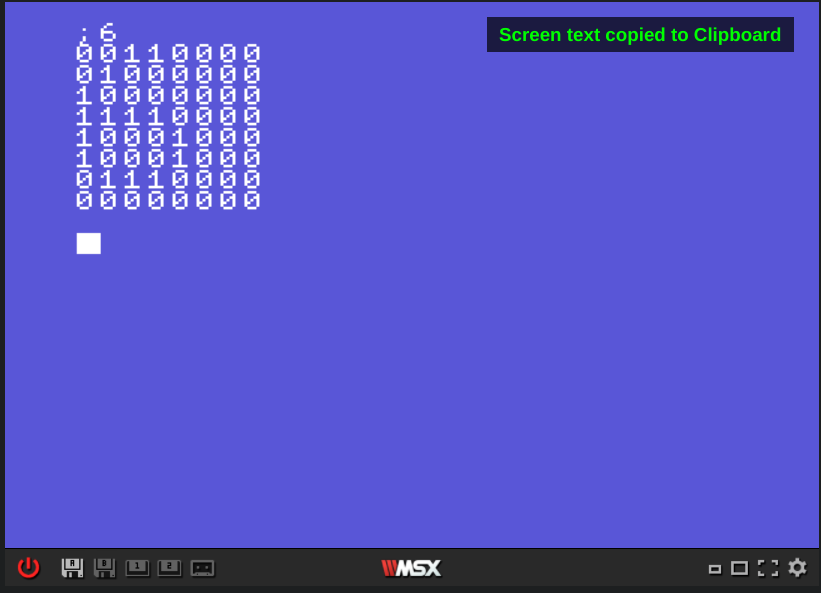
The code with the usual comments is the following:
CHGMOD:		equ 0x005f		;BIOS call to change the screen mode
CHPUT:		equ 0x00a2		;Prints the contents points by A on the screen
CLS:		equ 0x00C3		;Clear the screen. call XOR A before to clean up the Zero flag
ERAFNK:		equ 0x00CC		;Remove the function keys from the screen
CHGET:		equ 0x009F		;Wait for a key to be pressed
LDIRMV:		equ 0x0059		;Copies A blocks from the address HL of the VRAM into address DE in RAM

		org 0xc000		; Storing the program at page 3

main:
		ld a,1			;We set the screen mode 1 loading the value into A
		call CHGMOD		;then we call CHGMOD to change the video mode
		call ERAFNK		;Removing the function keys so it's not copied through alt+c
		ld hl,0x8*49		;Loading into HL the position for the first pattern. Each pattern uses 8 bytes
					;so we multiply 8 by the inicial character pattern at position 49 = 0
		ld de,font		;Load into DE the position where the VRAM pattern will be copied
 	       ld bc,8*74		;We want 74 characters copied, from 0 through "z"
	        call LDIRMV		;Calls the routine to copy data from VRAM to RAM
	        ld hl,font		;We load the address defined for "font" into HL
	        ld bc,74		;then we set the counter on BC for the main loop
	        ld d,49			;and store in D the value for the first character (0) to print later
		call loop		;Calling the main loop
	        ret			;then returning to BASIC when BD decreases to 0
loop:
		push BC			;Let's send BC to the stack
		push DE			;followed by DE
		XOR A			;This should reset the Zero flag
		CALL CLS		;so we can call CLS to clear the screen
		ld b,8			;Loading 8 into B to iterate on each bytes of the character pattern
		pop DE			;Let's bring DE back from the stack
		ld a,";"		;Load the character ";"into A
		call CHPUT		;then print it before printing the current character being shown
		ld a,d			;Get the value from D and load into A
		call CHPUT		;and print it, which corresponds to the letter being iterated ahead
		inc d			;We decrease D
		ld a,"\r"		;Load the ASCII code for return into A
		call CHPUT		;Then print it to return to the start of the line
		ld a,"\n"		;next we load the ASCII code for new line into A
		call CHPUT		;then print it, moving the cursor to the new line below
		call iterate		;Calls the iterate routine that prints the pattern as binary
		call CHGET		;Waits for a key to be pressed after printing the pattern of each letter
		POP BC			;Brings back BC from the stack
		dec BC			;Decrements BC
		LD A,C			;Loads C into A
		OR B 			;And excutes A OR B
		JR NZ,loop		;While the zero flag is not raised repeats the loop
		ret			;Returns to the main routine

iterate:			;This routine probably can be improved using shift operations
				;but to keep things simple to understand I left it as it is
		bit 7,(hl)		;Reads the first bit from the byte pointed by HL
		call z,zero		;and calls the zero routine if the result is zero
		call nz,one		;otherwise calls the one routine
		bit 6,(hl)		;Same thing but with the next bit
		call z,zero		;so we repeat the whole process
		call nz,one      	;on every bit from the by pointed by HL
		bit 5,(hl)		;and call the proper routine to print
		call z,zero		;the ASCII character related to the value
		call nz,one
		bit 4,(hl)
		call z,zero
		call nz,one
		bit 3,(hl)
		call z,zero
		call nz,one
		bit 2,(hl)
		call z,zero
		call nz,one
		bit 1,(hl)
		call z,zero
		call nz,one
		bit 0,(hl)
		call z,zero
		call nz,one
		ld a,"\n"		;After the last bit is checked we add a new line
		call CHPUT		;and print it
		ld a,"\r"		;then we add a carriage return
		call CHPUT		;and aso print it
		inc hl			;Increase HL to get the next byte
		djnz iterate		;And do this until B reaches 0
		ld a,"\n"		;At the end of the iteration we add another new line
		call CHPUT		;and print it
		RET			;returning to the loop routine
zero:
		ld a,"0"		;We load the ASCII character "0" into A
		call CHPUT		;then print it
		RET			;and return to the caller from the iterate routine
one:
		ld a,"1"		;We load he ASCII character "1" into A
		call CHPUT		;then print it
		RET			;abd return to the caller from the iterate routine

font:
		DB 0			;Initial value of font
		end main		;This ends the program as required by the MSXPen code parser
In the end, this resulted in a pretty simple and functional program but very limited use, unless you are looking to use a text editor to create your font patterns in binary.
But, can we make something better?
Of course, we can! We need to transfer the original font patterns from the WebMSX emulator to the TinySprite tool, and the binary format is not useful for this requirement.
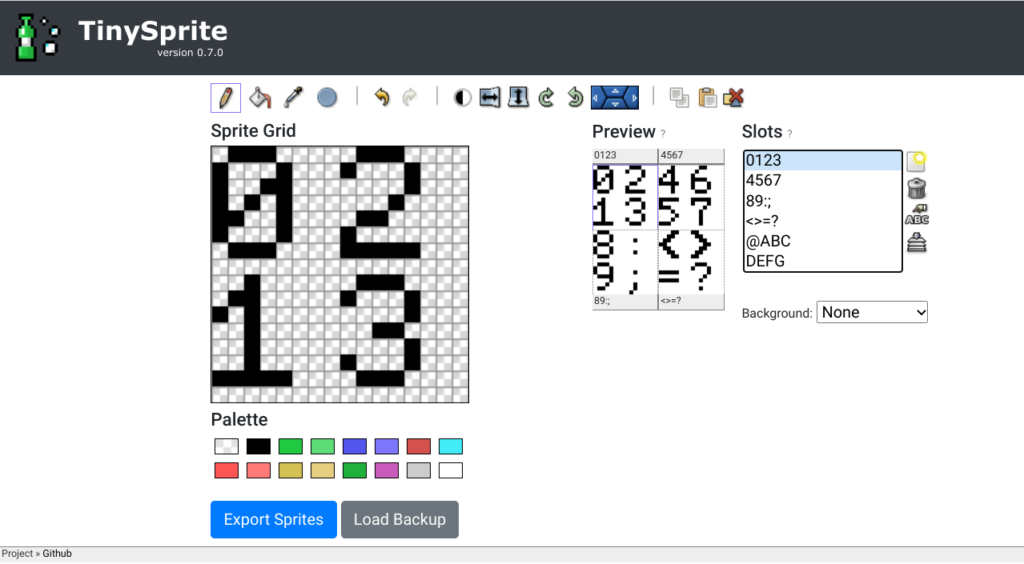
The TinySprite tool allows us to import pattern designs through two different methods:
- Using the “Load Backup” button and pasting the backup in the widget field
Notice that the tool uses a proprietary backup format that, although being in text mode, needs to follow the proper parameters otherwise it will result in garbage being loaded into the slots. This is how a TinySprite backup looks like:
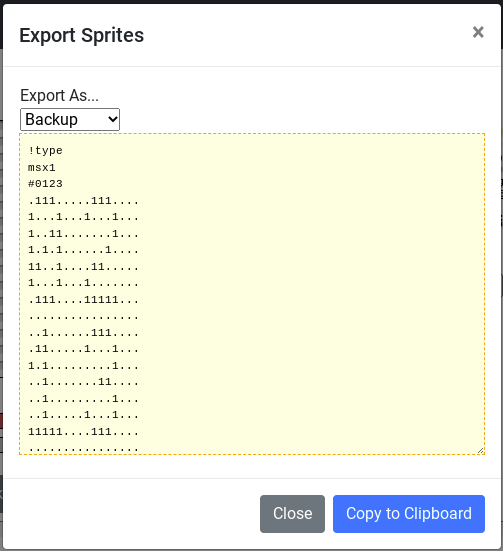
The header describes the sprite type (MSX1/MSX2), the name of the slot (0123 for this example), then we have the pattern where dots are empty/transparent spaces and the numbers are related to the color used by the pixel at the positions.
The Export Sprites and Load Backup are the options available to provide data persistence on the tool, since every time the site is closed or even reloaded all content is lost. Don’t say I didn’t warn you about that!
- Use the “Import DATA into Slot”
This option is available through the last icon from the right side of the Slots field, the one with the arrow pointing down to a bunch of pages that look like a continuous form paper from the days of yore:
This one is really useful since we can load patterns into a single slot, and it’s what we will use to transfer the data from the WebMSX output, but it has some limitations. I couldn’t load any data using binary format into the slots, and the only format that worked for me was in hexadecimal, so this is what I’m going to use here.
It took me quite some time to figure out what would be the best way to transform my requirements into a useful code. I tried to do some crazy stuff like storing the values in the RAM then changing the screen mode back to 40×24 text mode, then writing the data on a device, and then showing the information one character at a time, but in the end, I finally came with a solution that delivered what I needed quite well! The best thing is that I could find a complete assembly code that transforms decimal values into hexadecimal, and this saved me a lot of time, to be honest! Thank God for StackOverflow!
Here is the code that prints all patterns for the characters between the number 0 through the lower case letter “z”:
; bios call to print a character on screen
CHGMOD:		equ 0x005f		;Changes the screen mode
WRTVRM: 	equ 0x004d		;Grava na VRAM no endereco HL o conteudo de A
CHPUT:  	equ 0x00a2		;Imprime o conteudo de A na tela
LDIRMV:		equ 0x0059		;Copies A blocks from the address HL of the VRAM into address DE in RAM
ERAFNK: 	equ 0x00CC		;Removes the function key from the screen
LINL32:		equ 0xF3AF		;Width for SCREEN 1 (default 29)
CHGET: 		equ 0x009F		;Waits for a key to be pressed
CLS: 		equ 0x00C3		;Clear screen. Requires Zero flag to be set, so XOR A should do the trick

		org 0xD000		;Lets store the program at page 3

start:
		ld hl,LINL32		;We are changing the screen width in mode 1
		ld (hl),32		;by setting the value 32 at the address opinterd
		ld a,1			;then loading 1 into register A
		call CHGMOD		;and calling CHGMOD routine
       		call ERAFNK		;Lets remove the function keys from the screen so it's not copied along with the data
        	ld hl,0x8*48		;We will copy the data from the VRAM from the 48th character (0), so we multiply it by
					;8 which is the size of each pattern
		ld de,font		;Loading into DE the memory position for the font
        	ld bc,75*8		;We want to copy 8 bytes of 75 character patterns, so BC will be set as 75*8
        	call LDIRMV		;Call the routine to copy the data from VRAM to RAM
		ld hl,font		;Let's put the RAM position where the pattern were copied into HL
		ld b,5			;Then set 5 into B as the number of pages with the hexadecimal output
initial:
		push BC			;Save BC in the stack
		ld b,16			;Load 16 into b, which will be the counter for character patterns per page
		ld c,1			;Load 1 into C, which will be used to add a break line after 4 lines of patterns
		call mainloop		;Calls the main loop
		call CHGET		;Wait for a key to be pressed to control the output pagination
		xor a			;Raising the Zero flag
		call CLS		;so we can clear the screen calling the routine CLS
		POP BC			;Bringing back BC from the stack
		djnz initial		;then looping through initial until B decreases to zero
		ret			;end program and returns to BASIC, hopefully
mainloop:
		PUSH BC			;Saving the values from BC into the stack
		ld b,8			;Loading 8 into B, which will be the counter for loop
		call loop		;Calling the loop routine
		ld a,"\r"		;We add ASCII code for carriage return into A
		call CHPUT		;then we print it
		ld a,"\n"		;next we load the next line into A
		call CHPUT		;and calls CHPUT again, jumping the cursor to the beginning of a new line
		pop BC			;Getting BC back from the stack
		inc hl			;Incrementing HL to proceed to the next character pattern
		ld a,c			;Now we will load the value from C into A
		cp 4			;And compare it with 4, which will take care of the line break for each block
		call z,skip4		;If CP 4 raizes the zero flag, we call the skip4 routine
		INC C			;Incrementing the counter at C
		djnz mainloop		;Then looping through mainloop until B decreases to zero
		ret			;which allows to return the program back to the initial routine

skip4:
		ld c,0			;Load 0 into C to reset the counter
		ld a,"\n"		;Then once again we print new line
		call CHPUT		;and
		ld a,"\r"		;carriage return
		call CHPUT		;on the screen, creating an empty line between blocks of 4 character patterns
		ret			;and return to the mainloop
loop:
		ld a,"$"		;each hexadecimal value needs to be preceeded by the dollar sign
		call CHPUT		;so we print it first during the loop
		ld a,(hl)		;now we load the value where HL is pointing at
		call NumToHex		;and call the NumToHex to transform the decimal value into hexadecimal
		ld a,d			;The NumToHex return the values on DE, do we first load D into A
		call CHPUT		;and print the first digit of the hexadecimal value
		ld a,e			;then we load E into A
		call CHPUT		;to print the second digit of the hexadecimal value
		djnz loop2		;and jump into loop2 until B decreases to 0, to avoid adding a comma at the
					;end of the line with the pattern data
		ret			;finishing the loop and returning to the mainloop routine
loop2:
		ld a,","		;the loop2 will add a comma between the hexadecimal values
		call CHPUT		;and print it
		inc hl			;then increase the position pointed by HL
		jr loop			;and repeat the loop routine

NumToHex:    				;Routine borrowed from
					;https://stackoverflow.com/questions/22838444/convert-an-8bit-number-to-hex-in-z80-assembler
		ld c, a			;a = number to convert
		call Num1		;calls the Num1 routine
		ld d, a			;then loads A into D
		ld a, c			;and restores the value of A from C
		call Num2		;calling the Num2 routine after that
		ld e, a			;and loading A into E
		ret			;return with hex number in DE

Num1:
		rra			;9-bit rotation to right - http://z80-heaven.wikidot.com/instructions-set:rr
		rra			;rotates A to the right again
		rra			;and again
		rra			;and once more
Num2
		or $F0			;execute an OR operation on A and $F0
		daa			;the A register is BCD corrected using the contents of the flags
					;http://z80-heaven.wikidot.com/instructions-set:daa
		add a, $A0		;load $40 into A
		adc a, $40		;Ascii hex at this point (0 to F)
		ret			;and returns to the NumToHex routine
font:
		db 0
		; use the label "start" as the entry point
		end start
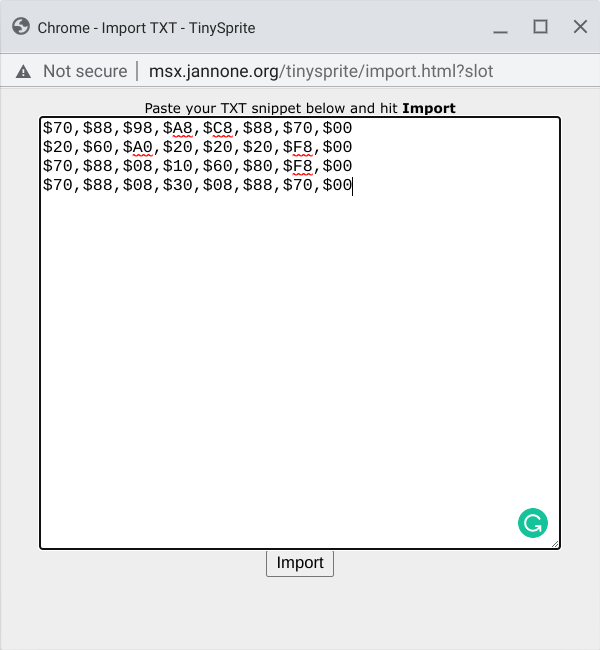
The program can be executed at MSXPen from this link, and after each page is printed you can use Alt+C to copy the content to the clipboard as shown here:
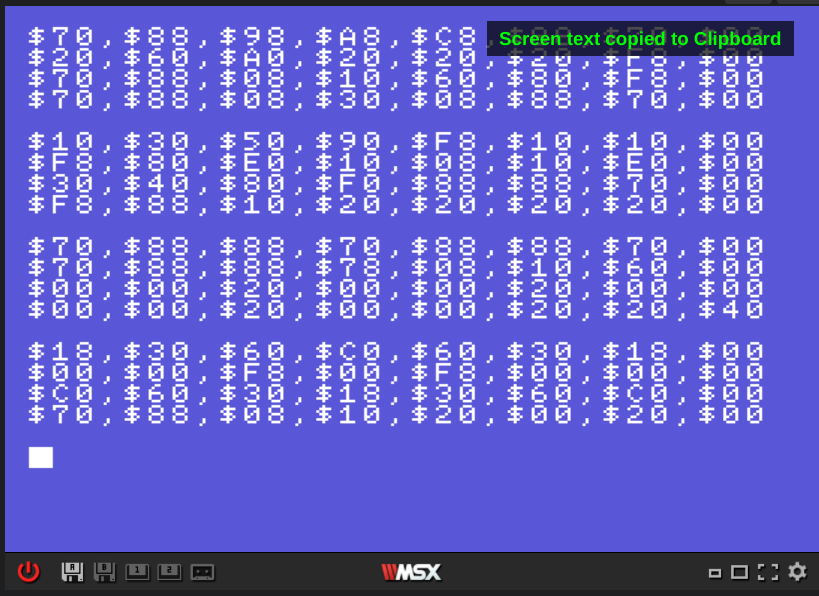
Next, we just need to use the “Import DATA into slot” option from TinySprite to load the patterns. Notice that we need to enter only 4 lines of patterns on each slot, and that’s why the code adds a space after four lines with data. See how nice a person I am?
Wash, rinse, and repeat until all characters are loaded into 19 slots of the TinySprite tool. I also changed the names of each slot to make things easier.
Can it be just a little easier?
Yes, it can! Just download the TinySprite backup file below, copy its content and paste at the tool’s “Load Backup” widget!
Now we have everything we need to create that amazing font type we always wanted, and load it back on our MSX machines to print amazing texts! But this is a subject for another article. Until then have fun modifying your character patterns but don’t forget to back up your work after finishing!
In the last article, we learned how to modify a single character from the original MSX font type, and we also found out the differences between Screen 0 and Screen 1 character, but now what we want to do is to create our own personal font type as artsy as possible. Fancy! Before we start…