The magic 4×8 font generator
Some time ago Breno Motta, who is one of the members of Facebook’s MSX Brasil Oficial group published a picture of a short BASIC program that creates a “compressed” font style with 4 x 8 pixels on Screen 2 based on the text showing on the screen. It was really interesting to see how the program was able to create a really perfectly readable font with such a small footprint, and I got really curious in learning more about how it worked, and I found out that it is really simple but also very clever!
About Breno’s code
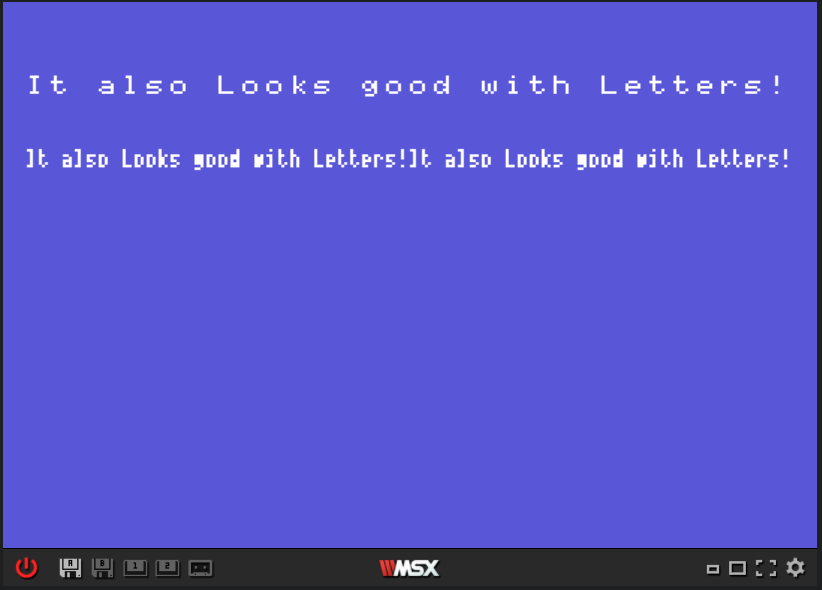
This is the picture Breno Motta published in the Facebook group on January’s 1st 2022:
He also posted a picture from the BASIC code which I typed on MSXPen and am also providing below:
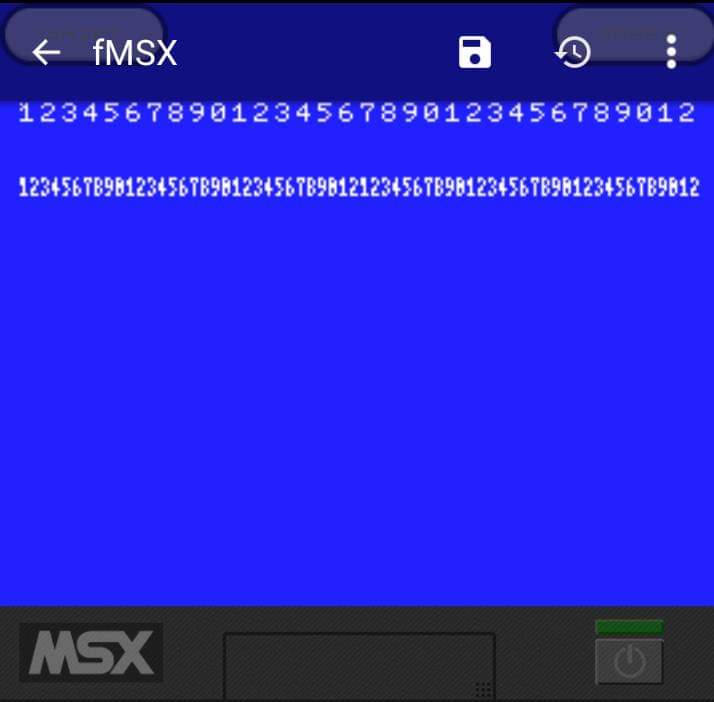
1 color 15,4,4
2 screen 2
3 open "grp:" for output as #1
4 preset(0,20),15
5 print #1,"12345678901234567890123456789012"
6 for g = 0 to 7
7 for f = 0 to 255
8 a = point(f,g+20)
9 if a = 15 then pset(f*.5,g+48),a
10 if a = 15 then pset(128+f*.5,g+48),a
11 next f,g
12 goto 12
So how this code works? We start by changing the screen colors and screen mode in the first 2 lines. Next in line 3, we use the OPEN command to create an output file identified as #1, which is the “channel” we use to print characters in Screen 2 since it doesn’t support using PRINT directly.
Line 4 will use the PRESET command to basically position the cursor at position X = 0 and Y = 20, which in text mode could be done using the LOCATE command. Notice that a white pixel will be set on this position of the screen since we are also stating the color 15 in the code, but if we omit this value the pixel will not show on the screen with no change in how the code works.
Just a side note here: the difference between PSET and PRESET is that the first command will set a pixel in the screen using the color defined for the foreground and the second will set the pixel using the background color if no value is provided as the color parameter, so they basically SET and RESET the pixel color.
Line 5 will print the string that will be used during the “compression” process at the position previously used by the PRESET command. It’s important to notice that there is a special reason for this location in the next steps. Then we create two nested loops with G and F, so we can iterate G from 0 through 7 and F from 0 through 255. Both variables will be used to read the string and “print the pixels” of the compressed font as we will see further.
Now line 8 is an interesting one. We will use the command POINT to read the color from the pixel at the position X by Y, which means that we are basically reading the text printed on the screen and writing down the status of each of the pixels based on if they are lit or not. Clever, ain’t? Using F for the X position (column) and G+20 for the Y (row) the code will read the pixels from the screen’s rows 20 through 27, which are the 8 pixels from the character at the position, and then repeat this at the next column 255 times which is the horizontal resolution from Screen 2.
Now the compression magic happens at line 9. We check if the value stored in A by the POINT command is equal to 15 (White), and use the PSET command to light up the pixels at line 48 (G+48) and row F*.5, which basically means “multiply F by 0.5 and set the pixel there”. Since the VDP won’t work with fractioned numbers it will ignore any value after the decimal point, resulting in a pixel set at the same position from the previous when the multiplication result is a fraction. If we change PSET(F*.5,G+48) with (F/2,G+48) we will have the same output but there may be some performance difference that I couldn’t observe so far so your mileage may vary. Line 10 does the same thing but from row 128 onward, showing that the resulting output is twice the number of characters from the original string.
So basically what the code does is to copy the 8 pixels from the first column of the character from row 20 to column 0 and row 48 on the screen, then plot the next 8 pixels in the same column 0, then move to column 1 at row 20 and copy the 3rd and 4rth column in the same place, repeating the same pattern until reaching the end of row 20 at column 256. It’s also interesting to notice that this will work to any string entered at line 5, as long as it only spawns a single line and you don’t mind having the same string repeated in row 48!
Changing and improving the code
This code is nice and short, but boy it’s slow! Using BASIC’s PSET command is not the fastest thing in an MSX machine, so what could we do to improve that? Well, we could code the whole thing in assembly!
Will it be as short as the original BASIC program? Nope. I’m quite sure that I could reduce the program to half of its size using shift operators on the BIT and SET/RES routines but I want to leave the code readable and easier to understand.
Will it be faster? It sure will!
Will it be the same logic? Not at all. Some high-level commands that we have in BASIC aren’t easily recreated in ASM, so we had to take some shortcuts, but the results are 99% the same.
Let’s check how the code works:
; bios calls
CHGMOD:		equ 0x005F	;Change the screen mode to the value defined in A
GRPPRT:		equ 0x008D	;BIOS routine to print character in graphic screen mode
CHGET:		equ 0x009F	;Waits for a key to be pressed and stores the value in A
LDIRVM:		equ 0x005C	;Copy BC blocks from VRAM address stored in DE into RAM address stored in HL
LDIRMV:		equ 0x0059	;Copy BC blocks fro RAM address stored ad DE into VRAM address stored in HL
FILVRM:		equ 0x0056	;Fill BC blocks of the VRAM starting at addres stored in HL with the values from A
				;System Variables
				;These two variables aren't documented at Grauw docs, and I found them at
				;https://www.msx.org/forum/msx-talk/development/positioning-grahphical-cursor-in-screen-2
GRPACX:		equ 0xFCB7	;Show or set the current row-position of the cursor
GRPACY:		equ 0xFCB9	;Show or set the Current column-position of the cursor

            			; the address of our program
            org 0xD000

start:
		ld a,2		;We need Screen 2 for this program
		call CHGMOD	;so we call CHMOD with A=2 to change into graphic mode
		ld hl,GRPACX	;We want to print our string of numbers at the column 0
		ld (hl),0	;and for this we set GPRACX
		ld hl,GRPACY	;The string will be printed at row 16 instead of 20 like in the BASIC program
		ld (hl),16	;making it easier to copy the values ahead
		ld hl,$0600	;$0600 is the VRAM position that correlates with the row 48 in the screen if the name table isn't modified
		ld (Vaddr),hl	;so we save this value in the Vaddr variable
		ld hl,$0200	;$0200 is the VRAM address where we will find the pattern data of string printed on the screen
		ld (copyStringAddr),hl	;so we save this value in the variable copyStringAddr
		ld hl,message	;Let's put the address of the message string in HL
		call printString	;and call our routine to print it
		ld bc,16	;With the string already printed, we set a loop counter on BC the repeat the startLoop code
startLoop:
		push bc		;Save BC on the stack
		call copyString	;Call the copyString routine
		call compressString	;Call the compressString routine that will change the pattern, "compressing" the character
		call pasteString	;Call the pasteString routine that will print the new patters at row 48
		pop bc		;Get BC back from the stack
		DEC BC		;Decreases BC
		ld a,c		;Load C into A
		or b		;Then OR B with A, which will raise the Zero flag in F if BC = 0
		jp nz,startLoop	;repeats the loop until BC = 0

		call CHGET	;Waits for a key to be pressed
		RET		;and returns to BASIC

printString:
		ld a, (hl)	;This is our usual way to print strings in the screen, by loading the value pointed by HL into A
		cp 0 		;and checking if the value in A = 0, which is our end of string control
		ret z		;if Zero flag is raised, return to the Start block
		call GRPPRT	;We call GRPPRT instead of CHPUT because we are using a graphic mode
		inc hl		;Next we increase HL to skip to the next value from message
		jr printString	;and repeat the loop

copyString:
		ld hl,(copyStringAddr)	;To copy the pattern from the screen we will load the value from copyStringAddr into HL
		ld de,stringData	;and load in DE the position to stringdata
		ld bc,16		;and 16 in BC for the number of bytes to be copied from HL to DE
		call LDIRMV		;when LDIRMV is called. This will copy the pattern data from the VRAM into RAM
		ld de,$0010		;We need to increase the position pointed by copyStringAddr, so we load $0010 into DE
		ADD HL,DE		;and add HL with DE, since HL already have the value from the copyStringAddr loaded previously
		ld (copyStringAddr),hl	;then se send the results back to copyStringAddr
		ret			;and return to the StartLoop block

compressString:
		ld ix,stringData	;Now comes the tricky part. We load the stringData position into IX
		ld bc,8			;and set a new counter in BC to 8
loop:                                   ;We will check the value from every bit from 6 to 0 (left to right, remember?)
                                        ;and replicate the even bit values into the previous odd ones, reducing 8 bits to 4
		bit 6,(ix)		;Check the value from bit 6 - even
		call nz,bit7Set		;and set bit 7 if not zero, resulting in bit 7 having the data from both bits 7 and 6
		bit 5,(ix)		;Check the value of bit 5 - odd
		call z,bit6Reset	;and reset bit 6 if zero
		call nz,bit6Set		;or set bit 6 if not zero
		bit 4,(ix)		;Check the value of bit 4 - even
		call nz,bit6Set		;and set bit6 if not zero, resulting in bit 6 having the values from bits 5 and 4
		bit 3,(ix)		;Check the value of bit 3 - odd
		call z,bit5Reset	;and reset bit 5 if zero
		call nz,bit5Set		;or set bit 5 if not zero
		bit 2,(ix)		;Check the value of bit 2 - even
		call nz,bit5Set		;and set bit 5 if not zero, resulting in bit 5 having the values from bits 3 and 2
		bit 1,(ix)		;Check the value of bit 1 - odd
		call z,bit4Reset	;and reset bit 4 if zero
           	call nz,bit4Set		;or set bit 4 if not zero
		bit 0,(ix)		;Check the value of bit 0
           	call nz,bit4Set		;and set bit 4 if not zero, resulting in bit 4 having the values from bits 1 and 0
					;The block above compresses the 8 bits values into 4 bits, and since a new tile in made of
					;8x8 pixels we can jump ahead and compress the next 8 bits into the second nibble of IX
					;then print 2 characters into a single tile
		bit 7,(ix+8)		;We will do the whole check/reset/set thing again, but this time we will check the data
		call z,bit3Reset	;that is 8 bytes ahead from IX and set the values at the bits between 3 and 0
		call nz,bit3Set		;which will compress the values from the next pattern into the current position pointed by IX
		bit 6,(ix+8)		;so I believe that I don't need to explain everything again, right?
		call nz,bit3Set
		bit 5,(ix+8)
		call z,bit2Reset
		call nz,bit2Set
		bit 4,(ix+8)
		call nz,bit2Set
           	bit 3,(ix+8)
		call z,bit1Reset
		call nz,bit1Set
		bit 2,(ix+8)
		call nz,bit1Set
		bit 1,(ix+8)
		call z,bit0Reset
           	call nz,bit0Set
		bit 0,(ix+8)
           	call nz,bit0Set

		inc ix		;When our compressing thing is done with the byte pointed by IX we well jump to the next one
		DEC BC		;and use the method of decreasing BC
		LD A,C		;loading C in A
		OR B		;Doing A OR B which will raise the Zero flag in F
		JP NZ,loop	;and repeat the whole loop again until BC reaches to 0
		ret		;returning the program execution to startLoop

bit7Reset:
		res 7,(ix)	;Lazy coding, but this is all it does: reset the bit 7 and
		ret		;returns

bit7Set:
		set 7,(ix)	;Set the bit 7
		ret		;then returns

bit6Reset:
		res 6,(ix)	;Same thing until reaching bit 0
		ret

bit6Set:
		set 6,(ix)
		ret

bit5Reset:
		res 5,(ix)
		ret

bit5Set:
		set 5,(ix)
		ret

bit4Reset:
		res 4,(ix)
		ret

bit4Set:
		set 4,(ix)
		ret

bit3Reset:
		res 3,(ix)
		ret

bit3Set:
		set 3,(ix)
		ret

bit2Reset:
		res 2,(ix)
		ret

bit2Set:
		set 2,(ix)
		ret

bit1Reset:
		res 1,(ix)
		ret

bit1Set:
		set 1,(ix)
		ret

bit0Reset:
		res 0,(ix)
		ret

bit0Set:
		set 0,(ix)
		ret

pasteString			;Let's print the results from the compressed font
		ld hl,$2600	;Since we don't know what is set at the attribute table
		ld a,$f0	;we well set A to F0, which is white foregroung and transparent background
		ld bc,$FF	;and fill the 256 bytes at the pattern table address $2600
		call FILVRM	;to ensure that our pattern will show in the screen as a white text

		ld de,(Vaddr)	;We load the value from Vaddr into de
		ld hl,stringData;and the stringData into HL
		ld bc,8		;then set the block size to 8
		call LDIRVM	;and copy the data from RAM to the VRAM

		ld de,(Vaddr)	;To duplicate the string at the right side of the screen
		ld hl,$0080	;we add $80 to the value pointed by Vaddr
		ADD HL,DE	;and the result will be stored in HL
		PUSH HL		;then we push HL to the stack
		pop DE 		;and bring the value back, but on DE instead

		ld hl,stringData;so we can load the stringData again into HL
		ld bc,8		;define a 8 bytes block in BC
		call LDIRVM	;and call LDIRVM to copy the data from RAM to VRAM, targeting the right side of the screen

		ld de,(Vaddr);	;Now we will prepage Vaddr to point to the pattern table related to the next column of the screen
		ld hl,$0008	;by loading $8 into HL
		ADD HL,DE	; and addinng DE with HL, sending the results into HL again
		ld (Vaddr),HL	;which will return the value back to the position related to Vddr

		ret		;finally returning to the startLoop block again


Vaddr:				;Our variables are set below
		dw 0

copyStringAddr:
		dw 0

message:			;and our original string as well
		db "12345678901234567890123456789012",0

stringData:
		dw 0

            ; use the label "start" as the entry point
            end start
Notice that not even once I mess with the name table here, and since every time that we change to screen 2 the BIOS will fill the name table with values from 0 the 255 three times, one for each 3rd of the screen, we are playing battleship with the values already set at the VRAM by the BIOS. Is this bad? No, if you keep in mind that you shouldn’t touch the name table – or should if you want to “move things around a little”.
Why all the effort to do this?
Because it’s fun! I learned a lot reading the original code and learned more while trying to replicate the results without actually doing the same thing. I also played with shift and rotating commands which didn’t end in the article but helped me to understand how it’s possible to reduce the code size and get rid of repetitive commands, and I’m satisfied with the final result. Is it possible to do something better? Yes, it is, and Breno already made this by creating a 64×24 text editor for the MSX!
That’s enought for today!
As usual, leave your comments and questions here, and share this article with your friends and family!
Some time ago Breno Motta, who is one of the members of Facebook’s MSX Brasil Oficial group published a picture of a short BASIC program that creates a “compressed” font style with 4 x 8 pixels on Screen 2 based on the text showing on the screen. It was really interesting to see how the…