Let’s make an MSX game – Game concept
Any game creation should start with a story, a premise, a reason explaining why things are happening, or anything that justifies the events we will witness develop on our screens. It doesn’t need to be a Shakespearean screenplay or even make any sense at all, as long as it can be translated into a playable game.
I tried to imagine a game concept that could be simple to create but at the same time compelling to be played, something like Flappy Bird and Angry Birds (but without birds this time), and also wouldn’t require too much effort to design graphics and assets for it. Since my level of sanity isn’t that high, It didn’t take too long to come up with a crazy idea for a game after all:
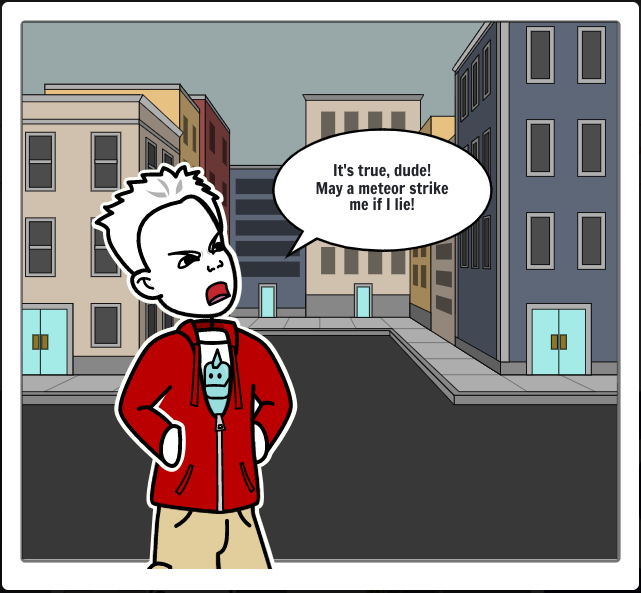
You are a meteor, travelling nicely though the sideral space without too much to do or anything new to see. Suddenly you feel a little entity from a pale blue planet summoning you , defying your will power, mocking your simply existence, and that just make you really, really mad!

Made with Storyboard That
The game objective
As a mighty meteor, your objective is to reach the surface of the planet Earth and hit the defiant citizen in the head, just to show these puny humans that no bad deeds should pass without consequences.
But traversing the several layers of Earth’s shield is not an easy task. Usually, a meteor that penetrates the planet’s atmosphere is reduced to very small pieces during the entrance and doesn’t even reach the ground at the end. But you are a smart meteor and you know that passing the layers with care may avoid the shameful fate of becoming space dust, and the dude down there will get away free from your wrath. Unacceptable!
But other bonus perks may make your ultimate sacrifice more delightful: planes, parachutes, and other human-made flying objects can be found on the path to your target, so destroying them will give you that special feeling of vindication, along with some bonus points and even some well-deserved assistance! So hitting everything you find in your way that deserves to be grounded is a must.
So this is the deal: descent from the heavens, avoid burning down by Earth’s protective layers, hit a few bypassers through the way, and finally smash that filthy liar as hard as he deserves.
Game mechanics
So here are the rules and constraints the game should be based on:
- The game starts with the meteor in outer space, starting to descend into Earth through the five layers of the planet’s atmosphere:
- Exosphere: This is the starting point in outer space, and there will be no hazardous elements here, We may add some satellites as targets here just for fun.
- Ionosphere: due to the electrified ions existing on this layer, some hazards may affect the meteor somehow.
- Thermosphere: With temperatures reaching up to 1500 degrees celsius, it’s a good idea to slow down the descent through this layer.
- Mesosphere: This is where a meteoroid becomes real meteorites or simply turns into space dust. The player needs to avoid the hazards on this level as much as possible to succeed in the next layer.
- Stratosphere: Human-made flying objects will start to show at this level, but the jet streams can diverge the character’s direction and miss the ultimate target.
- Troposphere: Now it’s time to speed up in the target’s direction before the victim flees from the local. Hitting flying objects may add points or cause hazards to our character, and pollution can also make things more difficult.
- Earth’s crust: hit the target or fail miserably on your mission.
- The player needs to control the descent and avoid the hazards during the travel:
- Suffering damage will decrease the meteorite’s size to a point where it turns to dust, losing a life
- Heating up too much can cause the meteorite to melt and lose mass.
- Colling down too fast will cause the meteorite to crack, losing chunks of its body and shrinking in size
- Striking objects through the path can recover some mass of the meteorite along with bonus points
- Missing the target at the end of the descent will decrease the life and reduce the total points obtained.
A few grams of inspiration, a ton of perspiration
Now that we have a basic concept of what the game will be, let’s do some hard work. As usual, I’m using Jannone’s TinySprite to create a mock-up for our deadly meteor character, which will be used as it is for now but might improve in the future.
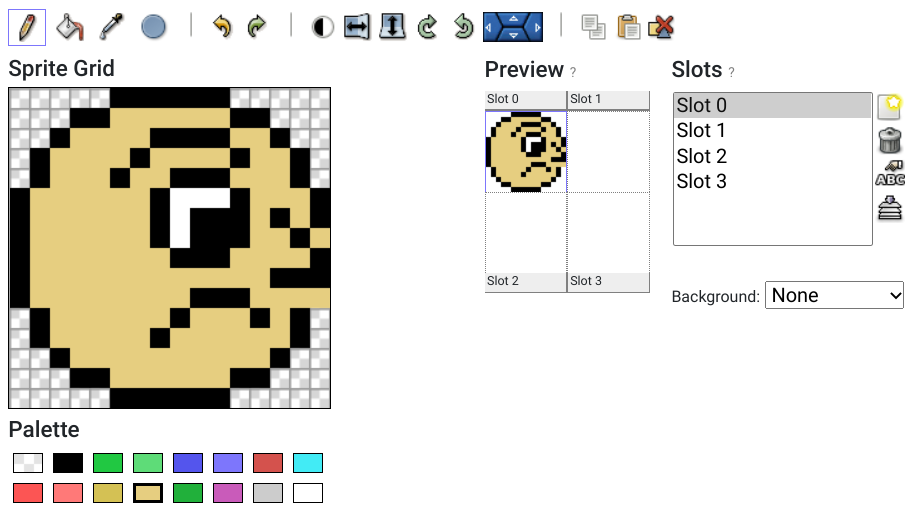
Exporting the sprint as ASM Hexadecimal results in the two sets of sprites below, one for each color:
; --- Slot 0
; color 1
DB $07,$18,$21,$42,$44,$81,$81,$81
DB $80,$80,$80,$40,$41,$20,$18,$07
DB $E0,$18,$E4,$12,$E2,$11,$75,$72
DB $E1,$07,$70,$8A,$02,$04,$18,$E0
; color 11
DB $00,$07,$1E,$3D,$3B,$7E,$7E,$7E
DB $7F,$7F,$7F,$3F,$3E,$1F,$07,$00
DB $00,$E0,$18,$EC,$1C,$0E,$0A,$0D
DB $1E,$F8,$8F,$74,$FC,$F8,$E0,$00
; color 15
DB $00,$00,$00,$00,$00,$00,$00,$00
DB $00,$00,$00,$00,$00,$00,$00,$00
DB $00,$00,$00,$00,$00,$E0,$80,$80
DB $00,$00,$00,$00,$00,$00,$00,$00
We will load the sprites into the VRAM and then position sprite 1 on top of sprite 0, so we can end up with a 2 colors character. Notice that this will consume 50% of the possible sprites per line that the TMS99918 is capable to show, but since the game action will occur from top to bottom the probability of having more than 4 sprites at the same line is minimal in this case. We can also use tiles for the other objects or even try to set the second color as a tile instead of a sprite and figure out how to keep the tiles at the same position as the sprite, and I think that both scenarios could be attempted in the next articles as an exercise for our coding skills.
Initial game coding and structuring
Although I’m not a professional game developer and just an amateur programmer in general, there are some basic coding structures that I would like to apply in this project to make my life easier in the future. Taking advantage of the possibility to add separated files for the program provided by the 8BitWorkshop IDE, I will separate the code into different files depending on the task executed by the routines. Things like BIOS call and System Variables will be added to their respective files, and I will do that slowly during the series of articles so anyone can understand what are the contents of each file and won’t get overwhelmed by facing a huge list of crazy names and memory addresses with no further explanation.
To make things more didactic I will start the game code in a single file, then in the next article, I will show how to transfer the contents to new files keeping the program working and making it easier to visualize the code logic – I hope it so!
Proceeding to the 8BitWorkshop IDE, I will create a new project with the game name by selecting “New Project” in the IDE menu. For now, I will call it “The Meteor Game” and then we can come up with a better name like “Come, Meteor!” or something else.

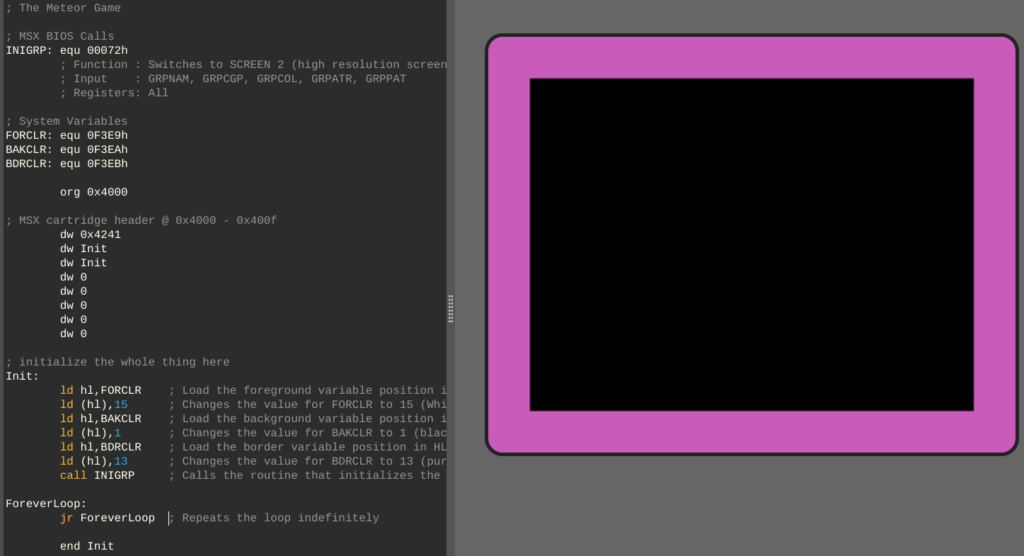
After initiating a new project we will notice that the previous code will still be running in the IDE, and we can reuse some of the available code such as the MSX cartridge header which is required for the MSX to recognize the ROM properly. This is the most basic code to generate a valid ROM file, and although it compiles correctly with some warnings it won’t do anything at all:
; The Meteor Game

	org 0x4000

; MSX cartridge header @ 0x4000 - 0x400f
	dw 0x4241
        dw Init
        dw Init
        dw 0
        dw 0
        dw 0
        dw 0
        dw 0

; initialize the whole thing here
Init:
	ret
	end Init
So far all we have is the hexadecimal code for our game protagonist and nothing else, and what I want to do now is to see the little meteor showing on the screen. For this simple task we need to do the following things in our code:
- Define the foreground, background, and border colors
- Tell the VDP that we want to use the Graphic Mode, also known as Screen 2 in BASIC
- We want to show the meteor as a sprite in the display, so we need to copy it from memory to VRAM
- The character has three different colors, which will require three overlapped sprites.
Let’s keep this short list of tasks for now because this will already require some effort.
Setting the colors on the screen
The MSX system variables are quite powerful apart from one or other missing things we will notice soon. For setting up the three color variables in our assembly code, we will use the following variables:
| Variable name | Memory address | Size in bytes | Memory address |
| FORCLR | #F3E9 | 1 | Foreground color |
| BAKCLR | #F3EA | 1 | Background color |
| BDRCLR | #F3EB | 1 | Border color |
What do all those values mean? The variable name is simply a convention defined for the MSX architecture, so you can use any other name as long you remember in the future what they mean or have enough patience to go through all the code to find out their meaning. The memory address is the location in the system RAM where this information will be stored, so the BIOS calls that reference the values will consult this specific place from the memory to execute whatever it was supposed to.
Now, we need to know how we change the values of any variable in the system. In BASIC, simply adding something like LET FORCLR=15 will set the variable to the value correspondent to the color white, but this is not that simple in assembly, and we need to first load the memory position of the variable into one of the Z80 registers, then load the value into the position pointed by the register. Complex? Not so much:
Let’s first define the variables and their respective memory positions in our code:
;System Variables
FORCLR:	equ 0F3E9h
BAKCLR:	equ 0F3EAh
BDRCLR:	equ 0F3EBh
I usually add this section before the origin (org) statement, and after the BIOS calls section. Soon we will move this whole section to a separate file to keep the main code clean.
Next, we need to change the values for the foreground, background, and border to the colors we want to have on the screen. I will use a white foreground (value 15), black background (value 1), and purple border (value 13) for now, so this is how we set the variables in assembly:
; initialize the whole thing here
Init:
	ld hl,FORCLR	; Load the foreground variable position in HL
        ld (hl),15	; Changes the value for FORCLR to 15 (White)
        ld hl,BAKCLR	; Load the background variable position in HL
        ld (hl),1	; Changes the value for BAKCLR to 1 (black)
        ld hl,BDRCLR	; Load the border variable position in HL
        ld (hl),13	; Changes the value for BDRCLR to 13 (purple)
        call INIGRP	; Calls the routine that initializes the screen mode

ForeverLoop:
	jr ForeverLoop ; Repeats the loop indefinitely

        end Init
Notice that we have a new label named “ForeverLoop” and after that a single statement that is a JR (Jump Relative) to the same place, which is a loop with no exit. This is due to the C-BIOS not having a BASIC ROM to return if a program ends with a simple RET, and also because we want to see the results before exiting the code.
This code is nice and all but once again, this program does not do anything at all. Simply setting variables doesn’t result in any change of behavior from the VDP, unless you call the BIOS routine that instructs the VDP to enter in a new (or even the same!) graphic mode.
Changing the screen mode and setting the new colors
We are now going to use one of the MSX BIOS calls to inform the VDP that we want a new screen mode to be set, along with the color values we defined at the variables. There are some different calls to do the same action, but the one we want at this point is the INIGRP:
INIGRP
Address  : #0072
Function : Switches to SCREEN 2 (high resolution screen with 256×192 pixels)
Input    : GRPNAM, GRPCGP, GRPCOL, GRPATR, GRPPAT
Registers: All
The INIGRP lives at the address 00072f of the ROM, and has the task to change the screen to graphic mode along with initializing other system variables related to the name, color, and pattern tables, which we will use in the future to know where we can store our graphics in the VRAM without having to calculate every position manually. It’s handy, trust me.
Once again we need to define this label and the address in our code so we can use it in the future. We could just skip that and call the actual memory position, but this would make our code hard to read and understand:
; The Meteor Game

; MSX BIOS Calls
INIGRP:	equ 00072h
	; Function : Switches to SCREEN 2 (high resolution screen with 256×192 pixels)
	; Input    : GRPNAM, GRPCGP, GRPCOL, GRPATR, GRPPAT
	; Registers: All
I like to leave the comments with an explanation of what the call does so I can quickly refer to it if I have any doubts about what registers are used and affected. We know now that calling INIGRP will modify all registers, so we cannot trust any value set at them after the call and we need to ensure that we will push to the stack any register value we may need again in the future.
Now our code will finally do something visible: change the screen colors!
; initialize the whole thing here
Init:
	ld hl,FORCLR	; Load the foreground variable position in HL
        ld (hl),15	; Changes the value for FORCLR to 15 (White)
        ld hl,BAKCLR	; Load the background variable position in HL
        ld (hl),1	; Changes the value for BAKCLR to 1 (black)
        ld hl,BDRCLR	; Load the border variable position in HL
        ld (hl),13	; Changes the value for BDRCLR to 13 (purple)
        call INIGRP	; Calls the routine that initializes the screen mode
And voila! We still have nothing but in different colors!
Placing our meteor in the outer space
It’s now a good time to add the code obtained from TinySprite to our game. I like to add the patterns at the end of the code, but once again they will be changed in the future so it’s just a matter of good visualization for the whole code at the moment:
ForeverLoop:
	jr ForeverLoop	; Repeats the loop indefinitely

MeteorIdleSprite01:
; color 1
        DB $07,$18,$21,$42,$44,$81,$81,$81
        DB $80,$80,$80,$40,$41,$20,$18,$07
        DB $E0,$18,$E4,$12,$E2,$11,$75,$72
        DB $E1,$07,$70,$8A,$02,$04,$18,$E0

MeteorIdleSprite02
; color 11
        DB $00,$07,$1E,$3D,$3B,$7E,$7E,$7E
        DB $7F,$7F,$7F,$3F,$3E,$1F,$07,$00
        DB $00,$E0,$18,$EC,$1C,$0E,$0A,$0D
        DB $1E,$F8,$8F,$74,$FC,$F8,$E0,$00

MeteorIdleSprite03:
; color 15
        DB $00,$00,$00,$00,$00,$00,$00,$00
        DB $00,$00,$00,$00,$00,$00,$00,$00
        DB $00,$00,$00,$00,$00,$E0,$80,$80
        DB $00,$00,$00,$00,$00,$00,$00,$00

        end Init
Setting a sprite on the screen requires three simple steps:
- Copy the pattern data from RAM to the VRAM at the position defined by the GRPPAT variable
- Copy the attributes from the RAM to the VRAM at the position defined by the GRPATR variable
- See the sprite showing on the screen as you expected!
The values stored by the GRPPAT and GRPATR are the actual positions at the VRAM where the sprites are stored, and the sprite ID is defined by the “slot” where the pattern is allocated. The memory values for each variable are the ones below:
F3C7H GRPNAM: DEFW 1800H   ; Name Table Base
F3C9H GRPCOL: DEFW 2000H   ; Colour Table Base
F3CBH GRPCGP: DEFW 0000H   ; Character Pattern Base
F3CDH GRPATR: DEFW 1B00H   ; Sprite Attribute Base
F3CFH GRPPAT: DEFW 3800H   ; Sprite Pattern Base
To better understand the slot x sprite ID thing, consider that sending a pattern data to the VRAM at the address 3800H will result in the sprite with ID 0 being created, then sending another pattern data to the address 3808H will create thee sprite with ID 1, and so on until reaching the limit of 32 sprites that the TMS9918 can handle.
The pattern data used to create a sprite can be set using binary or hexadecimal values, depending on how you created the sprite. For 8×8 pixels sprites, it’s needed to copy 32 bytes of data related to the sprite pattern into the VRAM, and for 16×16 pixels sprites, the value is 64 bytes. As for the attribute values, it’s comprised of just 4 bytes:
-> Vertical position, from zero through 191
-> Horizontal position, from zero through 251
-> Sprite number, from zero through 31. There is a caveat here that will be explained later
-> Foreground and Background colors
So to put our meteor at the top left side of the screen but a few pixels from the border, our attribute data will be something like:
MeteorIdleSprite01_attrib:
	DB $05,$5,$00,$01	; Line 05, column 05, sprite ID 0,
        			; transparent(0) foreground and black (1) background

MeteorIdleSprite02_attrib:
	DB $05,$05,$04*1,$0B	; Line 05, column 05, sprite ID 1,
        			; transparent(0) foreground and black (1) background

MeteorIdleSprite03_attrib:
	DB $05,$05,$04*2,$0F	; Line 05, column 05, sprite ID 2,
        			; transparent(0) foreground and black (1) background
The caveat mentioned before can be seen here, which is the ID of the sprite being multiplied by 4 in the attribute’s 3rd byte. But why? Remember that by default the sprite size is 8×8 pixels, but we are using 16×16 pixels sprites in this case, and that means the attribute needs to be offset 4 blocks of 8×8 pixels sprites forward to find the next sprite ID. Does this sound overwhelming to wrap your mind around? Just follow the standard of multiplying the ID value by 4 for now and everything will work, but we will simplify the whole thing soon in the next articles.
With both the pattern and attributes loaded into the MSX memory, we can now start to move data between the RAM and VRAM, and for that, we will use the BIOS call named LDIRVM:
LDIRVM
Address  : #005C
Function : Block transfer to VRAM from memory
Input    : BC - Block length
           DE - Start address of VRAM
           HL - Start address of memory
Registers: All
This call Loads the data from the RAM address pointed by HL into the VRAM at the address pointed by DE, then Increment both HL and DE and decreases BC, then Repeat the loop until BC reaches 0, effectively copying the data between the RAM and VRAM. Can you guess what the LDIRMV call does?
Now that we know what we need to copy to what position at the VRAM and which command to use for that, why now go ahead and create our first sprite? Consider it done!
        ld de,03800h	; Load in DE the VRAM position for sprite with ID 0
        LD bc,64	; The amount of data to be transferred: 4 x 16 bytes
        LD hl,MeteorIdleSprite01	; Load the MeteorIdleSprite01 pattern in HL

        call LDIRVM	; Copy BC amount of bytes of the content pointed by HL into the VRAM at address loaded in DE

        ld de,01B00h	; Load in DE the VRAM position for the attributes
        ld bc,4		; The amount of data to be transferred: 4 bytes
        LD hl,MeteorIdleSprite01_attrib	; Load the MeteorIdleSprite01_attrib attribute in HL

        call LDIRVM	; Copy BC amount of bytes of the content pointed by HL into the VRAM at address loaded in DE

        ld de,03820h	; Load in DE the VRAM position for sprite with ID 1
        ld BC,64	; The amount of data to be transferred: 4 x 16 bytes
        ld HL,MeteorIdleSprite02	; Load the MeteorIdleSprite02 pattern in HL

        call LDIRVM	; Copy BC amount of bytes of the content pointed by HL into the VRAM at address loaded in DE

        ld de,01B04h	; Load in DE the VRAM position for the attributes of the sprite with ID 1
        ld BC,4		; The amount of data to be transferred: 4 bytes
        ld HL,MeteorIdleSprite02_attrib

       	call LDIRVM	; Copy BC amount of bytes of the content pointed by HL into the VRAM at address loaded in DE

        ld de,03840h	; Load in DE the VRAM position for sprite with ID 2
        ld BC,64	; The amount of data to be transferred: 4 x 16 bytes
        ld HL,MeteorIdleSprite03	; Load the MeteorIdleSprite03 pattern in HL

        call LDIRVM	; Copy BC amount of bytes of the content pointed by HL into the VRAM at address loaded in DE

        ld de,01B08h	; Load in DE the VRAM position for the attributes of the sprite with ID 2
        ld BC,4		; The amount of data to be transferred: 4 bytes
        ld HL,MeteorIdleSprite03_attrib

       	call LDIRVM	; Copy BC amount of bytes of the content pointed by HL into the VRAM at address loaded in DE

ForeverLoop:
	jr ForeverLoop	; Repeats the loop indefinitely
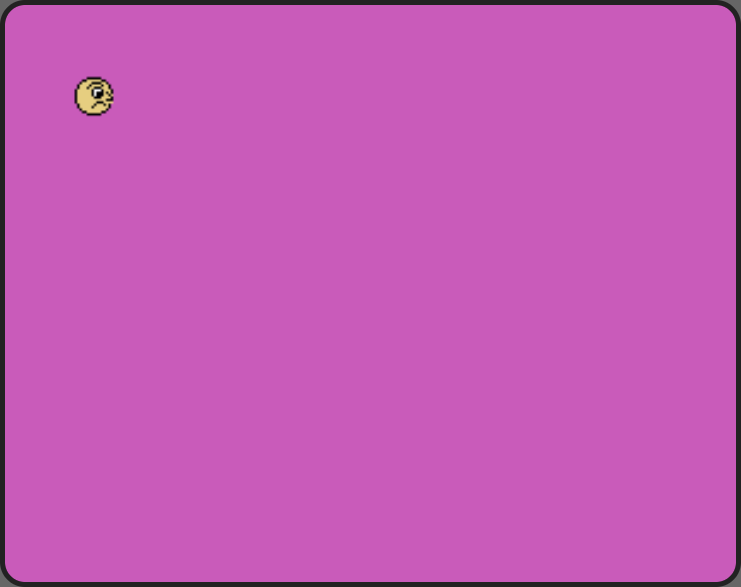
Since the Sprite 0 color is black, I changed the BAKCLR value from 1 (black) to 13 (purple) see I could see the sprites correctly, and this was the result of the new code:
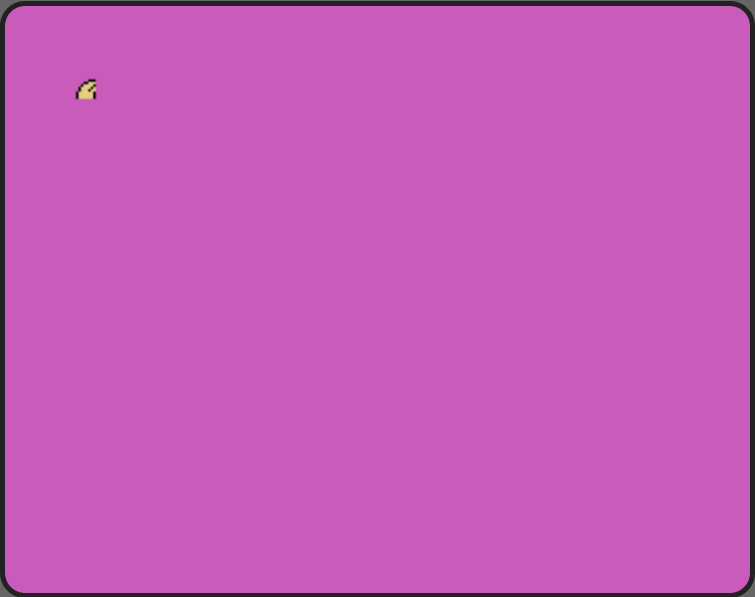
So what happened here? We can see that the three sprites and attributes are correct, but why can we only see the upper left side of our sprite?
This is because the default behavior of the VDP is to use 8×8 pixels sprites non-magnified. The other possible modes are 8×8 pixels magnified, 16×16 pixels non-magnified and finally 16×16 pixels magnified. Since we want to use 16×16 non-magnified sprites, we need to tell the VDP what we want.
Ok, all we need to do then is to use the BIOS call to change the sprite size, you gonna say. Well, sorry but, unlike the BASIC command Screen which accepts a second parameter to set the size and magnification of the sprite, there is no BIOS call for that. What about a system variable for that? Humm… nope, nothing like that here? So how do we configure this option? By modifying the values of the VDP’s register #1 to the desired mode.
First, let’s add the BIOS call that modified the VDP register to our list of routines:
WRTVDP:	equ 00047h
	; Function : Write data in the VDP-register
	; Input    : B  - Data to write
	;	     C  - Number of the register
	; Registers: AF, BC
We also need to add the System Variable where the values of the VDP’s register #1 can be retrieved:
RG1SAV: equ 0F3E0h
Next, we will add the routine that checks the current value set in the register #1 and modifies only the bits related to sprite size:
Set16x16Sprites:
	ld a,(RG1SAV)	; Load into A the current value of VDP's register 1
        and $FC		; AND A with $FC (11111100) resulting in xxxxxx00 (x=no change)
        or $02		; OR A with 00000010 resulting in xxxxxx10
        di		; Disable interruptions before calling the VDP
        ld b, a		; Load value from A into B to be used by WRTVDP
	ld c, $01	; Load the register value (#1) into C
	call WRTVDP	; Send to VDP register set at C (#1) the data stored in B
	ei		; Enable interruptions
        ret		; Return to the caller routine
Now, all we need to do is to call this routine just after setting the screen mode, and the meteor will appear complete in the purple sky:
Init:
	ld hl,FORCLR	; Load the foreground variable position in HL
        ld (hl),15	; Changes the value for FORCLR to 15 (White)
        ld hl,BAKCLR	; Load the background variable position in HL
        ld (hl),13	; Changes the value for BAKCLR to 13 (purple)
        ld hl,BDRCLR	; Load the border variable position in HL
        ld (hl),13	; Changes the value for BDRCLR to 13 (purple)
        call INIGRP	; Calls the routine that initializes the screen mode

        call Set16x16Sprites
Now it’s much better!
The code so far
Here is the complete code that we just created to show our protagonist on the screen:
; The Meteor Game

; MSX BIOS Calls
INIGRP:	equ 00072h
	; Function : Switches to SCREEN 2 (high resolution screen with 256×192 pixels)
	; Input    : GRPNAM, GRPCGP, GRPCOL, GRPATR, GRPPAT
	; Registers: All
LDIRVM:	equ 0005Ch
	; Function : Block transfer to VRAM from memory
	; Input    : BC - Block length
        ;            DE - Start address of VRAM
        ;            HL - Start address of memory
	; Registers: All
WRTVDP:	equ 00047h
	; Function : Write data in the VDP-register
	; Input    : B  - Data to write
	;	     C  - Number of the register
	; Registers: AF, BC

; System Variables
FORCLR:	equ 0F3E9h
BAKCLR:	equ 0F3EAh
BDRCLR:	equ 0F3EBh
GRPATR:	equ 0F3CDh
GRPPAT:	equ 0F3CFh
RG0SAV:	equ 0F3DFh
RG1SAV:	equ 0F3E0h

	org 0x4000

; MSX cartridge header @ 0x4000 - 0x400f
	dw 0x4241
        dw Init
        dw Init
        dw 0
        dw 0
        dw 0
        dw 0
        dw 0

; initialize the whole thing here
Init:
	ld hl,FORCLR	; Load the foreground variable position in HL
        ld (hl),15	; Changes the value for FORCLR to 15 (White)
        ld hl,BAKCLR	; Load the background variable position in HL
        ld (hl),13	; Changes the value for BAKCLR to 13 (purple)
        ld hl,BDRCLR	; Load the border variable position in HL
        ld (hl),13	; Changes the value for BDRCLR to 13 (purple)
        call INIGRP	; Calls the routine that initializes the screen mode

        call Set16x16Sprites

        ld de,03800h	; Load in DE the VRAM position for sprite with ID 0
        LD bc,64	; The amount of data to be transferred: 4 x 16 bytes
        LD hl,MeteorIdleSprite01	; Load the MeteorIdleSprite01 pattern in HL

        call LDIRVM	; Copy BC amount of bytes of the content pointed by HL into the VRAM at address loaded in DE

        ld de,01B00h	; Load in DE the VRAM position for the attributes
        ld bc,4		; The amount of data to be transferred: 4 bytes
        LD hl,MeteorIdleSprite01_attrib	; Load the MeteorIdleSprite01_attrib attribute in HL

        call LDIRVM

        ld de,03820h
        ld BC,64
        ld HL,MeteorIdleSprite02

        call LDIRVM

        ld de,01B04h
        ld BC,4
        ld HL,MeteorIdleSprite02_attrib

       	call LDIRVM

        ld de,03840h
        ld BC,64
        ld HL,MeteorIdleSprite03

        call LDIRVM

        ld de,01B08h
        ld BC,4
        ld HL,MeteorIdleSprite03_attrib

       	call LDIRVM

ForeverLoop:
	jr ForeverLoop	; Repeats the loop indefinitely

Set16x16Sprites:
	ld a,(RG1SAV)	; Load into A the current value of VDP's register 1
        and $FC		; AND A with $FC (11111100) resulting in xxxxxx00 (x=no change)
        or $02		; OR A with 00000010 resulting in xxxxxx10
        di		; Disable interruptions before calling the VDP
        ld b, a		; Load value from A into B to be used by WRTVDP
	ld c, $01	; Load the register value (#1) into C
	call WRTVDP	; Send to VDP register set at C (#1) the data stored in B
	ei		; Enable interruptions
        ret		; Return to the caller routine


MeteorIdleSprite01:
; color 1
        DB $07,$18,$21,$42,$44,$81,$81,$81
        DB $80,$80,$80,$40,$41,$20,$18,$07
        DB $E0,$18,$E4,$12,$E2,$11,$75,$72
        DB $E1,$07,$70,$8A,$02,$04,$18,$E0

MeteorIdleSprite01_attrib:
	DB $05,$5,$00,$01	; Line 05, column 05, sprite ID 0,
        			; transparent(0) foreground and black (1) background

MeteorIdleSprite02
; color 11
        DB $00,$07,$1E,$3D,$3B,$7E,$7E,$7E
        DB $7F,$7F,$7F,$3F,$3E,$1F,$07,$00
        DB $00,$E0,$18,$EC,$1C,$0E,$0A,$0D
        DB $1E,$F8,$8F,$74,$FC,$F8,$E0,$00

MeteorIdleSprite02_attrib:
	DB $05,$05,$04*1,$0B	; Line 05, column 05, sprite ID 1 (4*1),
        			; transparent(0) foreground and black (1) background


MeteorIdleSprite03:
; color 15
        DB $00,$00,$00,$00,$00,$00,$00,$00
        DB $00,$00,$00,$00,$00,$00,$00,$00
        DB $00,$00,$00,$00,$00,$E0,$80,$80
        DB $00,$00,$00,$00,$00,$00,$00,$00

MeteorIdleSprite03_attrib:
	DB $05,$05,$04*2,$0F	; Line 05, column 05, sprite ID 2 ($4*2),
        			; transparent(0) foreground and black (1) background


        end Init
As I mentioned before, this code is already long enough to make it hard to read, so in the next article, we will move things from the main file to other places, create some methods to allow less hardcoded values making the code more flexible, and add a call that returns the VRAM address of each sprite based on its ID, releasing us from needing to calculate each hexadecimal value manually.
If you like to see how the project looks after being published on GitHub, just check my repo TheMeteorGame.
We will be back soon, so stay tuned!
Any game creation should start with a story, a premise, a reason explaining why things are happening, or anything that justifies the events we will witness develop on our screens. It doesn’t need to be a Shakespearean screenplay or even make any sense at all, as long as it can be translated into a playable…
I thought the MSX can handle multiple colors on a single sprite, two per scanline. (same with the backgrounds)
Or the TMS9918 had a feature like this at some point.
Sadly, sprites with multiple colours are available only from the v9938 VDP onward (MSX2), and are not available on the tms9918.